A Little Hashicorp Vault introduction:
The Basics:
This will be an introduction to hashicorp vault (which I’m gonna start calling Vault from now on for simplicity (Don’t confuse it with Ansible Vault or any other Vault))
Vault is a Go application with a Rest/Cli interface that you can use to store secrets , very simple .
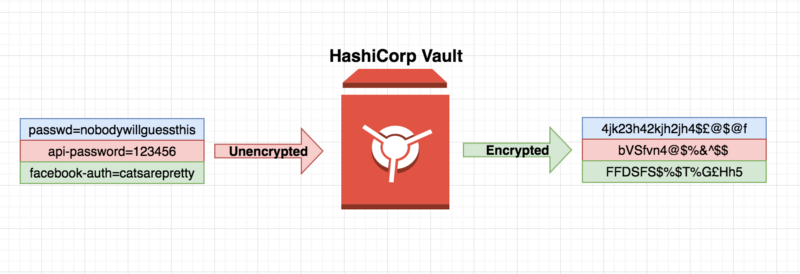
Vault will store this information encrypted (256AES on GCM) , but we will talk about this later
Secrets are things that you normally put on .gitignore or hiera-pgp or Ansible Vault , things that you don’t want to commit to source control for obvious reasons.
So in the simplest terms you will write stuff to Vault will encrypt it and keep it there for you for retrieval.
 The idea of Vault
Who can see my stuff?:
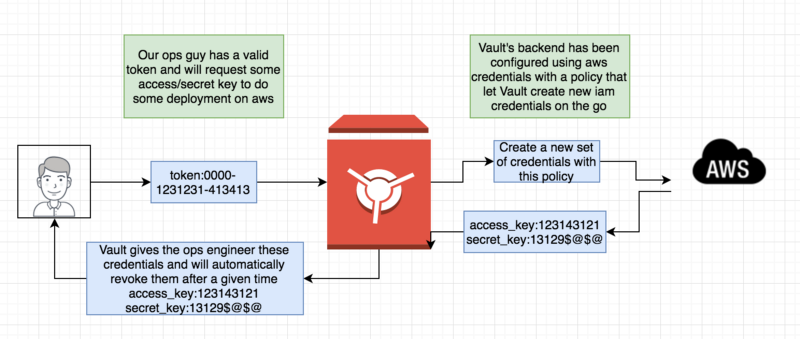
Vault uses a token to allow you to see info inside it , tokens can be created and revoked on demand . Also they can be set to expire after a given time.
So for example if you need to grant access to some information inside vault for an hour (because there’s something being rolled into prod) you can grant them a token for about an hour (or revoke the token once they confirm the change it’s done)
This is a silly diagram of how this could work , but obviously it can be all automated :
 Token creation and usage
Hands On:
You should be on Go 1.7 , i had some issues with 1.6 specially in the terraform part we gonna talk about later
Ok let’s install vault and have some fun with it , as you know like most Go projects , they ship their precompiled binaries and that’s probably the easiest way to get on with it is download vault from the official website ( https://www.vaultproject.io/downloads.html)
Inside the zip file you will find a binary that does the magic (unfortunately vault doesn’t come with a initd script or anything like that , but I’m sure a little google will fix that) , Vault comes with a dev mode for you to test things which is what we gonna use for now , so let’s start a dev server
./vault server -dev
After doing that what’s gonna happen is vault will create an in-memory backend ( more on backends later) and it will bound tcp:8200 by default , you also gonna get some output, let’s see:
==> Vault server configuration:
**_Backend: inmem_**
              Listener 1: tcp (**_addr: "127.0.0.1:8200"_**, cluster address: "", **tls: "disabled"**)
               Log Level: info
                   Mlock: supported: true, enabled: false
                 Version: Vault v0.6.1
==> **WARNING: Dev mode is enabled!**
In this mode, Vault is completely in-memory and unsealed.
Vault is configured to only have a single unseal key. The root
token has already been authenticated with the CLI, so you can
immediately begin using the Vault CLI.
The only step you need to take is to set the following
environment variables:
**export VAULT_ADDR='**[**http://127.0.0.1:8200'**](http://127.0.0.1:8200%27)
The unseal key and root token are reproduced below in case you
want to seal/unseal the Vault or play with authentication.
Unseal Key (hex)   : b03efb974cbb9023213e550dcab35d0bdaa518b0fe412395917ab162df538811
Unseal Key (base64): sD77l0y7kCMhPlUNyrNdC9qlGLD+QSOVkXqxYt9TiBE=
**Root Token: b724183c-15bc-ffd4-1d53-824626348866**
Ok that’s a lot of output , and it is all worth explaining a bit , in order of occurrence:
- Backend (tells you that -dev runs in memory by default)
- Tells you the address (127.0.0.1) and port it has bound to
- Tells you that TLS is disabled (for dev mode)
- Tells you to export VAULT_ADDR , this will be read by vault later on when we read/write data to it.
- Root Token , remember above we mentioned we need a root token to create other tokens in order to hand off to ops people?
Authenticate,Writing, Reading , Status,Token:
Vault is now running , it isn’t demonised so it will run on the foreground for you to see all that output.
Authenticate with your local Vault:
**$ VAULT_ADDR=**[**http://localhost:8200**](http://localhost:8200) **./vault auth adb1e4e3-e7c0-387b-5ad8-0d92fd282951**
Successfully authenticated! **You are now logged in**.
token: adb1e4e3-e7c0-387b-5ad8-0d92fd282952
token_duration: 0
token_policies: [root]
Let’s write something to vault:
**VAULT_ADDR=**[**http://localhost:8200**](http://localhost:8200) ./vault **write secret** secret=**donttellanybody**
So that was pretty simple , basically i tell it were to write and pass a key value pair so you can look it up later:
$ **VAULT_ADDR=**[**http://localhost:8200**](http://localhost:8200) **./vault read secret**
Key                     Value
---                     -----
refresh_interval        720h0m0s
mysecret                **donttellanybody**
And that’s it! we’ve written a key/value pair that is “securely” stored in vault and we were able to retrieve it.
So that was the basics , There’s a lot more info about Vault that should be read but i don’t want this to get too boring but i want to run through it:
Create a new token:
This creates a basic token with no expiration , and no policies , we gonna see more about this later:
$ VAULT_ADDR='[http://127.0.0.1:8200'](http://127.0.0.1:8200%27) ./vault **token-create**
Key             Value
---             -----
token           **6d2aed6c-e2e0-733b-3b81-5c0e34eec0cd**
token_accessor  96891866-e336-c6a6-a0c7-8d38861d5154
token_duration  0s
token_renewable false
token_policies  [root]
Backends:
Vault has a few backends (aws/ssh/inmem/etc) thing of them as models (in terms of mvc) or some virtual file system that has some logic.
For example the AWS backend , will create IAM credentials on demand , something called dynamic secrets (https://www.vaultproject.io/intro/getting-started/dynamic-secrets.html) , and revoke them when needed .
This is of great use when using automation tools where we don’t want to hardcoded credentials , look at this example scenario:
 the ops guy will have set of credentials for a given time , dynamically generated for him.
Rest Api:
Vault would be of little use of it didn’t feature an easy way read/write info to it , fortunately that’s not the case let’s see a little bit of the rest api.
It basically works with GET/POST/DELETE, and if you ever worked with JWT this will look familiar , the same token that we’ve been talking all along should be passed with the request as a custom header , for example:
The header X-Vault-Token does the magic for you there.
Clearly this opens a lot of doors , this means that you can call Vault from ansible or puppet or terraform wherever gives you the option to write a little plugin that does a http/https call.
Hooking things together
Now that we have Vault definitely running (in -dev mode , don’t forget you can’t go live with this ) let’s try to mock up how Ansible and Terraform would connect to this , obviously we will use the rest api to connect to Vault and luckily both (Terraform and Ansible) provide us with a plugin framework where we can do these things.
Terraform:
Terraform is also written in Go , and ships precompiled , if you don’t know what terraform is you should definitely take a look at their site (https://www.terraform.io) , but to make it quick an easy , terraform let’s you deploy virtual infrastructure in public/private clouds.
For example you could create 5 tier VPC with an elastic load balancer with a given number of EC2 instances running on it using a specific image , all that from a simple file , pretty neat.
So the question would be how can we access Vault stored values from terraform , for example of terraform needs an IAM cred or RDS etc.
Well a kind terraform user/dev has already started writing one (“https://github.com/redredgroovy/terraform-provider-vault”) , Unfortunately for us these hasn’t been included in the latest terraform release so we will need to compile it (make sure you’re using Go 1.7)
$ **git clone** [**https://github.com/redredgroovy/terraform-provider-vault**](https://github.com/redredgroovy/terraform-provider-vault)**
**Cloning into 'terraform-provider-vault'...
remote: Counting objects: 64, done.
remote: Total 64 (delta 0), reused 0 (delta 0), pack-reused 64
Unpacking objects: 100% (64/64), done.
Checking connectivity... done.
**$ cd terraform-provider-vault/
$ go build -o $GOPATH/bin/terraform-provider-vault**
**$ stat $GOPATH/bin/terraform-provider-vault**
  File: '/home/jeronimog/Projects//bin/terraform-provider-vault'
  Size: 14870377        Blocks: 29048      IO Block: 4096   regular file
Device: 801h/2049d      Inode: 1968433     Links: 1
Access: (0775/-rwxrwxr-x)  Uid: ( 1000/jeronimog)   Gid: ( 1000/jeronimog)
Access: 2016-09-28 18:12:58.864000000 +0100
Modify: 2016-09-28 18:12:59.780000000 +0100
Change: 2016-09-28 18:12:59.800000000 +0100
 Birth: -
**$GOPATH/bin/terraform-provider-vault**
This binary is a plugin. These are not meant to be executed directly.
Please execute the program that consumes these plugins, which will
load any plugins automatically
Steps:
- Clone the repo and cd into it
- compile , and set the destination to be $GOPATH/bin (common practice)
- stat it and check that it executes which it seems to be
Terraform plugins are binaries that terraform will execute when needed , so there’s not a lot of hassle when it comes to compiling. So let’s keep moving.
Adding the newly compiled module where terraform can see it:
We gonna copy that binary to were terraform can see it and configure it.
I have everything normally on ~/Projects/vaulttf/
cd ~/Projects/vaulttf
cp **$GOPATH/bin/terraform-provider-vault .
**$ ls
sample.tf **terraform** **terraform-provider-vault** **vault .terraformrc**
- sample.tf is a sample terraform file we gonna use to test this
- terraform is my terraform binary
- terraform-provider-vault is the plugin we just compiled
- .terraformrc is the terraform configuration file
First of all we will need to tell terraform where to look for this plugin , this is done in .terraformrc:
So we telling it , it is right there in the same path , (keep in mind relative paths when you’re working with this in prod)
Now let’s create a sample terraform file that retrieves information from Vault:
In short
- we call the vault provider , pass the toke and address
- create a resource passing the path where we gonna be looking up
- and create an output resource just to print out the variable we retrieve from Vault
The result should be something like:
 Console screenshot cause gist gets messed up by the terminal colors
gist anyways
So there you have it , a password retrieved from Vault through terraform already on a terraform variable to do whatever you want with it .
Ansible:
Another possibility is to retrieve infromation stored in Vault through Ansible (https://www.ansible.com/) , if you don’t know what ansible is I’ll use this description that i heard from a colleague:
“Ansible is nice wrap over a python script that get’s executed over ssh”
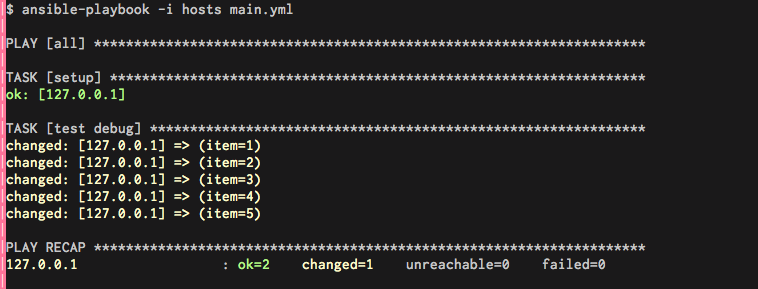
Ansible uses Playbooks to define actions that will be executed in a give host for example: (This is a very simplistic example just in case you don’t know anything about ansible)
And that outputs the action of logging to all servers over ssh and execute echo {{item}} per each element in the list [1,2,3,4,5]

Simple stuff really , but you see the possibilities of this.
A good example would be imagine that Ansible needs to re-deploy a model on a given database , but to do so Ansible needs the password , but we can’t hardcoded it into the playbook ( there’s other mechanisms to do this like Ansible Vault or others, but we’re focusing on Vault today )
There’s already some plugins written to do this , but i thought it would be a good idea to do mock our own plugin and see how this works.
So let’s create Ansible Plugin that retrieves “secret/photodb” from Vault.
Step 1 , let’s write that to Vault:

So that works , we now have rootpw:qwe123 inside “secret/photodb” mount point.
We can check this with curl too:

So that’s working now let’s make a little plug-in for ansible that retrieves this rootpw key and uses it to log in to mysql for instance.
The easiest way to create a lookup plug-in is just drop it into libraries on the root of your project (or it could be within a role too)
cd Projects/myansiblelittleplugin/
mkdir library/
And there we gonna create a file called photo.py , with this “very basic” content:
in Short:
- getphotopw it’s a simple function that accepts a dict as an argument , and creates a get requests against Vault
- the main function defines the ansible plug-in add adds a dict of dicts with all the arguments that i will pass further down in the playbook
- this is only a mock and needs a lot of work before hitting prod :)
Now the playbook looks like this:
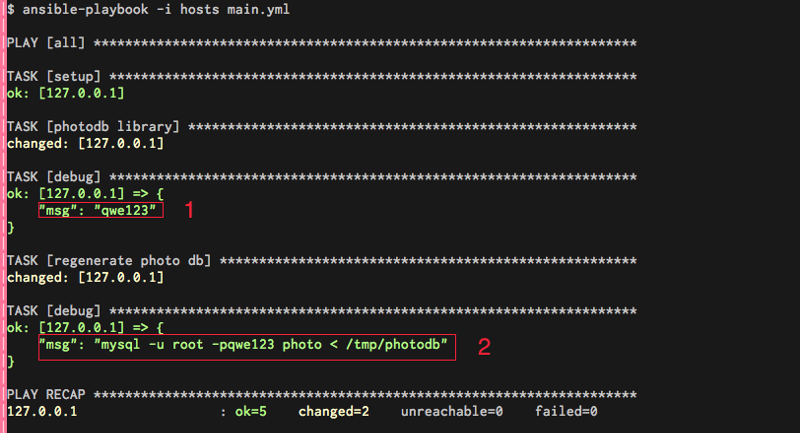
- note how i call the plug-in using a task “photo”
- pass all the required arguments
- register the output (Highlighted 1)
- debug the output which will be the root passw for the photodb
- and the run a command using it (highlighted 2)
The output will look like this:

Final Notes:
This is only a tiny introduction to Vault , there’s a lot more to explore , but i guess at least it’s clear how to interact with it and do basic operations.
Later on it would be nice to use different backends and go a little more in depth about the encryption levels it offers .